NTT DATA Business Solutions
SuccessFactors "Extension Center" Part I: Debut of a Powerful Tool in Q3 2016

SAP SuccessFactors “Extension Center” was introduced in Q3 2016 as an enhancement to SAP’s extensible framework. It was earlier known as “Metadata Framework.” The term Metadata Framework is very technical sounding jargon and it wasn’t conveying the usability to its target user group, i.e. Administrators. Extension Center is essentially meant for Customer Administrators and Partners to build Extensions on top of Employee Central to meet specific Business Needs.
How to Enable Extension Center?
Provisioning Requirements:
- To use Extension Center, Administrators/Consultants should have access to a Role to use MDF and Generic Objects in RBP
- Step 1 is to Enable Extension Center in Provisioning
- Make sure “Enable Generic Objects” and “Enable the Attachment Manager” are also enabled in Provisioning
- After enabling Extension Center, refresh the Metadata
Go to Admin Center -> Search and Click on “ODATA API Metadata Refresh and Export” -> Click on the “Refresh” icon under Refresh Metadata Cache.
Set up RBP Permissions:
The following RBP permissions are required to view “Extension Center” under Admin Center (Figure 1): Administrator Permission -> Metadata Framework -> Select the following options:
- Configure Object Definitions
- Configure Business Rules
- Read/Write Permission on Metadata Framework
- Import Permission on Metadata Framework
- Admin access to MDF OData API
- Manage Configuration UI
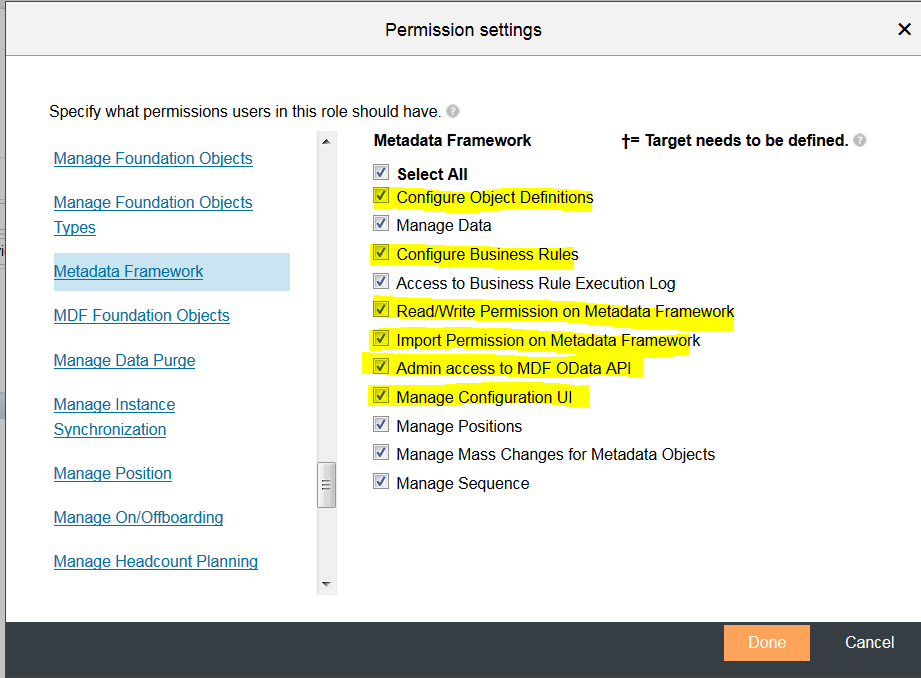
Figure 1: RBP Permissions required for Extension Center access
Note: Apart from these permissions, the User should have Edit access to “Workflow” to use Extension Center.
Once the required Provisioning and RBP permissions are given, the user can type in transaction “Extension Center” and see the default screen in Admin Center as shown in Figure 2.

Figure 2: Transaction “Extension” default screen in Admin Center
When do you use Extension Center?
An Extension Center is “an assortment of Rules, Workflows, Fields, and Picklists etc. to form a customized Business Process.”
You create an Extension when a certain Business Process is not available in standard EC offerings (because it’s really not part of an Employee Life-cycle) and relevant to an organization’s business process for tracking or record keeping purposes. Customers typically build extensions for their own specific business needs.
Here are some common examples of Business Processes to create an Extension:
- Approval for Company Car
- Asset Management
- Fitness Programs
- Tuition Reimbursement
Who can use Extension Center?
The entire purpose of Extension Center was to enable customers to be self-sufficient in Employee Central framework without depending on a SucceessFactors professional services team or partners implementation team.
Typically, a customer system admin (i.e. an HR admin with an inclination for technical design and with analytical skills) can create and deploy these extensions (provided Extension Center is already enabled in Provisioning) in Admin Center.
How to Access an Extension?
- An Extension can be configured as a Link in the SuccessFactors Homepage
- An Extension can be created as a Custom Tile in the SuccessFactors Homepage
- An Extension can be configured to access from People Profile
How to create an Extension?
In this blog, I will concisely cover some high level steps and processes to create simple extensions.
Note: A detailed user guide is available in SAP Help Portal (http://help.sap.com/cloud4hr). I will go through the step-by-step process to create an Extension in a subsequent blog.
Let’s take into account the common business process of “Requesting a company Cell Phone.”
For this example, there are three types of roles, or operators, involved: HR Admin, Employee, and Supervisor/Manager.

Figure 3: Common Roles in an Extension
Here are some of the activities each role will perform:
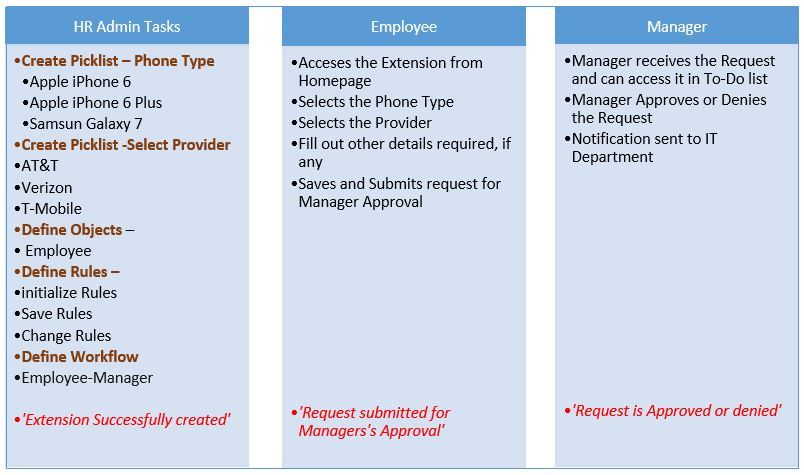
Figure 4: Details activities and processes for each role
In the Extension Center, to achieve the above Business Process, it will involve the following steps:
- Creating an Extension
- Creating Picklists
- Creating and Configuring Objects
- Configure Fields
- Defining Rules
- Defining Workflows
- Defining UIs (User Interface)
- Creating a Link or Custom Tile to Access the Extension
- Publishing an Extension
Creating an Extension
A system Admin/HR can go to Admin Center -> Extension Center to create a new Extension. Once an extension is created and available, it will show up in the Extension Center home page and is editable at any time (e.g. Cell-Phone Request).
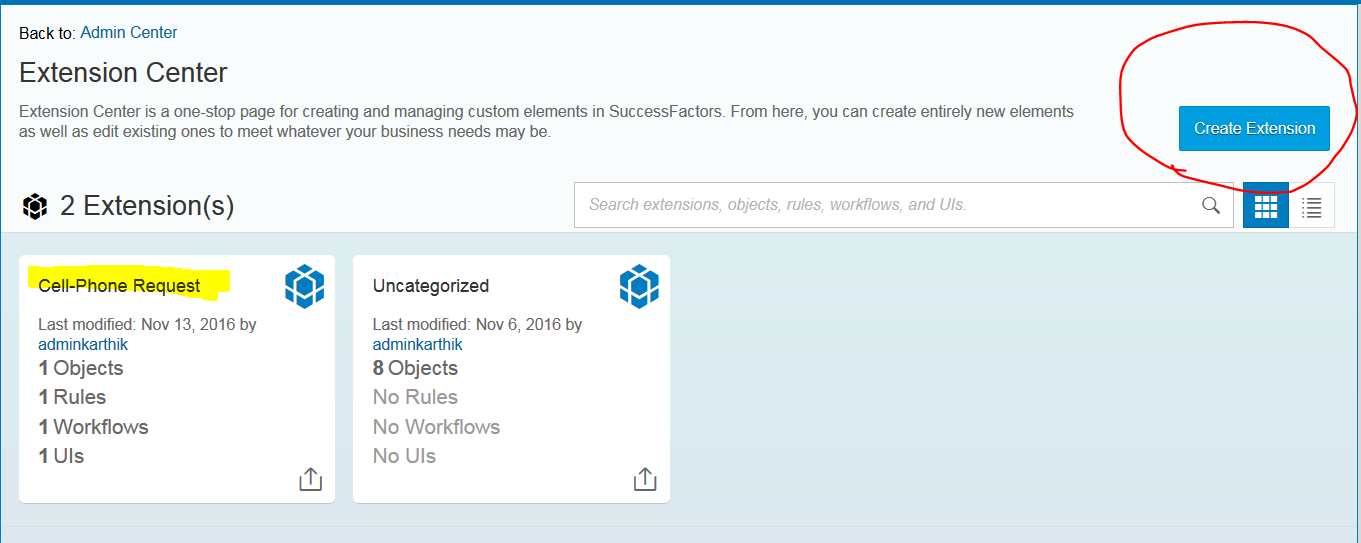
Figure 5: Home page of Extension Center
Creating Picklists
A new Picklist can be created while building the Extension on-the-go or you can use any existing Picklists that are already created. In this example, to Request Cell Phone, the following Picklists can be created:
- Cell Phone Type
- Cell Phone Providers
Creating and Configuring Objects
An Object is the main element of an Extension and defines all information which is part of the Extension, such as: Fields, Rules, and Workflows etc.
For the “Request Cell Phone” extension, there can be two Objects:
- Request Cell Phone
- Acknowledgement of the Request
Configure Fields
Fields are created based on the type of information needed for that Object. For the Request Cell Phone Extension, a few fields that can be created include:
- Employee Name
- Employee ID
- Employee Manager
- Department Name etc.
Defining Rules
Rules are defined for each Object. They use the same MDF (Meta Data Framework) that is used to create rules in Employee Central (e.g. for Hire/Rehire etc). You can create a brand new rule or use an existing rule and associate it with the Object.
You can also use rules to keep track of data changes (by triggering an approval).
For “Request Cell Phone,” a rule can be created to exclude a certain department or exclude a certain Employee Group from requesting a cell phone etc.
Defining Workflows
Workflows can be created on-the-go (similar framework based on how Employee Central Workflows are created) or existing workflows can be used. A typical workflow for Request Cell Phone can have two Roles:
- Employee (initiator) -> Manager (approver) -> Notification to HR
Defining UIs (User Interface)
You can use the UIs page to define what the form should look like. With the MDF UI functionality now HR admins can create the Form design right in the Extension.
All previously created picklists and associated fields automatically appear on this page.
Publishing an Extension
Once the Extension is ready, the final step is to publish the extension from the home page of Extension Center. To publish an Extension, the Source and Target instances must be specified in Provisioning.
Note: For this activity, customers have to rely on implementation partners or SAP Cloud Product Support team.
Prerequisite Procedure in Provisioning
- In Provisioning, go to Company Instance -> Instance Synchronization Company Permissions -> The Synchronize Company Data Permission page appears.
- Select either Configure Instance in the same Data Center or Configure Instance in different Data Center depending on whether your Source and Target instances are on the same Data Center or not.
- Enter Target Data Admin’s User ID, and select the Source. The Select Objects dialog box appears.
- Select all Configuration Items, and click Done.
- On the Synchronize Company Data Permission page, click Save
Publishing an Extension requires access to “Instance Synchronization Tool” in RBP.
Admins must have access to all Tasks under “Manage Instance Synchronization” under Administrator Permissions (highlighted in yellow) in RBP.
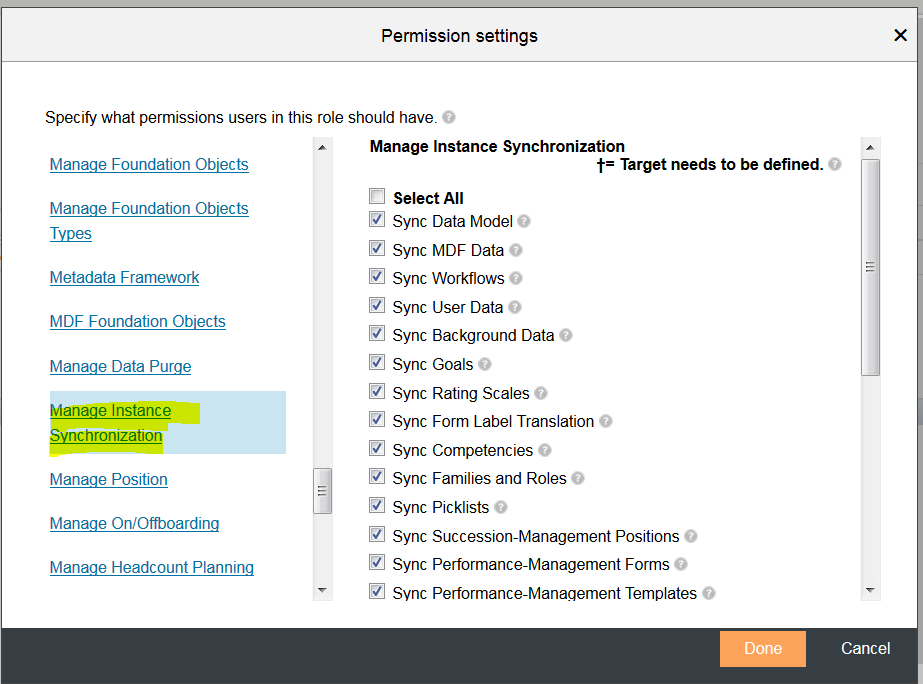
Figure 6: RBP Access needed for publishing an Extension
Creating a Custom Tile to access the Extension from Home Page or People Profile Page:
- An Extension can be configured to access as a Link in an existing tile in the home page or a new Custom Tile can be created for that Extension. It is done via the “Manage Home Page” transaction.
- It can also be added in the People Profile. To access any Extension from people Profile, a Field Employee ID with type User must be defined while defining Fields for the Object. The new Extension can be added to People Profile via Admin Center -> Configure Employee Files
I will cover the detailed step-by-step configuration in Part II of this blog series. Click here for more information on SuccessFactors.